Sunday, April 7, 2013

Sacher Torte

Sacher Torte

A little piece of history

The story of the world-famous Original Sacher-Torte began in 1832, when the Wenzel Clemens Prince Metternich, ordered the creation of a particularly palatable dessert for spoiled high-ranking guests.
"Take care that you do NOT make me look a fool tonight", he warned. That very day, however, the chef was unavailable! The order was reassigned to a 16-year-old apprentice in his second year, the quick-witted chap Franz Sacher...
One thing was certain; the speciality which was finally presented to the masters and mistresses was a resounding success: a soft and fluffy chocolate cake with the tasty apricot jam under the icing.
 
The cake consists of two layers of dense chocolate sponge cake with a thin layer of apricot jam in the middle, coated in dark chocolate icing on the top and sides.
There are innumerable variations of this traditionally secret recipe, this is our favorite version -

Ingredients
  • 150 g dark chocolate, chopped
  • 1 tbsp water
  • 155 g unsalted butter (make sure you use unsalted butter else the taste of the cake changes)
  • 1/2 cup castor sugar
  • 3 eggs (yolk and whites separated)
  • 1 cup plain flour (maida)
  • 2 tbsp castor sugar extra 
  • 2/3 cup apricot jam (heated and strained)
For chocolate icing -
  • 125 g dark chocolate chopped
  • 125 g unsalted butter (once again it is important to use unsalted butter)
Method
Melt chocolate in a heat proof bowl in a hot bath (heat water in a bowl which is smaller than the bowl in which you are melting the chocolate, so that the bowl of chocolate can sit on top of the hot water)
Stir in the water, cool to room temperature.
Cream the butter and sugar in a small bowl (using a small bowl ensures that the butter and sugar combine well with a fluffy consistency) with an electric beater until light and fluffy.
Beat in egg yolks one at a time, beating only until combined. Transfer the mixture to a large bowl, stir in the chocolate mixture and the sifted flour.
Beat egg whites in a separate small bowl until soft peaks are formed (soft peak consistency is when you pull away the whisk the eggs should form a soft peak without collapsing)
Gradually add the extra 2 tbsp of sugar that we had kept aside. Beat until dissolved between each addition. Fold lightly into chocolate mixture. (This is the most important step of the cake; it is very important to fold with a very light hand, ensuring that the egg does not loose its aeration, otherwise the resulting cake will be dense and hard)
Grease a deep 23 cm round cake pan, line the base with butter paper and grease the paper as well. Preheat the oven to 180 deg C. (I use a LG Microwave with convection mode and it works as well as any OTG)
Spread the mixture into the pan. Bake at 180 deg C for 30 min. Check if done with the toothpick method. Stand for 5 min before turning onto a wire rack for cooling. Trim the extra cake on top to give a flat surface and then leave the cake upside down (the bottom portion of the cake is flatter and serves better for icing). 
Split the cake (once cold) in half and place on a serving plate. Brush the heated and strained jam on top of the lower half of the cake, put the other half on top. Brush cake all over with the remaining jam. Stand for about 1 hr to allow the jam to set. (In places with hot summers, you can keep the cake in the refrigerator for half and hour).

For Chocolate Icing - Melt chocolate and butter in a hot bath (as above), stir until smooth. cool to room temperature until spreadable, stir occasionally. The icing will start becoming firmer, this can take upto 2 hours. (Again for places with hot weather, you can keep the icing in the fridge for 10-15 min, stirring frequently). This icing is also suitable for piping.

Now spread the top and sides with the icing. Let the icing set.


Keeping time is 2 days but you can keep it in the refrigerator for 4-6 days.

Lamingtons


LAMINGTONS

 A lamington is a dessert of Australian origin and consists of squares of sponge cake coated first in a layer of chocolate icing (traditionally) and then rolled in desiccated coconut.. Lamingtons are sometimes served as two halves with a layer of cream or jam (strawberry / raspberry) in between. This one comes from one of my aunts recipe books.

Ingredients

For the sponge cake -
  • 6 Eggs
  • 3/4 cups castor sugar (or powdered sugar)
  • 1 cup self raising flour (all purpose flour or maida with 2 tsp of baking soda)
  • 1/3 cup cornflour (I used custard powder in the same proportion)
  • 1/3 cup hot water
  • 15 g melted butter
For Icing
  • 4 cups (500g) icing sugar (or powdered sugar)
  • 1/3 cup Cocoa 
  • 15 g butter (melted)
  • 1/2 cup milk
For the final rolling in
  • 3 cups (250 g approx) dessicated coconut
Method

Beat eggs in a bowl with an electric mixer until thick and creamy; gradually add the sugar, beat until dissolved between each addition.
Put the butter in hot water and combine.
Fold in the sifted flour, then add the combined water and butter.
Pre-heat oven to 190-200 deg Celsius or 375-400 deg F
Grease a 23 cm square pan. Pour in the mixture.
Bake at 190-200 deg C for about 35 min.
Stand for 5 min before turning on to wire rack to cool.
Trim the crusts from the cake and cut into 25 squares (5 slices on each side of the square)

For the chocolate icing - sift the icing sugar and cocoa into a heatproof bowl, stir in the butter and milk, stir over a hot water bath until icing is smooth. (hot water bath - boil water in a large pan and then simmer, now put your bowl of chocolate icing in the large pan so that it does not get direct heat from the flame but the hot water keeps the icing in a syrupy state)

Now dip each piece of the cake into the chocolate icing, then toss in a tray of dessicated coconut till all sides are evenly coated.
Stand on a rack to set.


Keeping time - 2 days (maybe 3-4 if you are stingy and keep it in the fridge)
PS- will add in the pics of the preparation soon


Monday, March 18, 2013

Ber ka Achaar (Kuler Achar)

Ber ka Achaar or Kuler Achar

The other day we were taking a walk and we smelt the fragrance of ripe 'ber', which brought back a host of childhood memories of 'bodo kul & choto kul' and the 'ber-wala' outside the school. Buying a 'chatak' of ber from the ber wala for 5 np (naya paisa) and shooting the seeds from our mouths like cannon. The tree was laden with a thousand ber, so with the kids we had an outing to pluck the ber. I dont know about the kids but i sure had loads of fun throwing a stick up into the tree and waiting for the shower of ber, some ripe and brown and others green; then rushing around to see who picked up the most!!
The recipe was something I tasted as a kid and I referred to the net a bit but went by feel....


Ingredients -
250 gms Ber
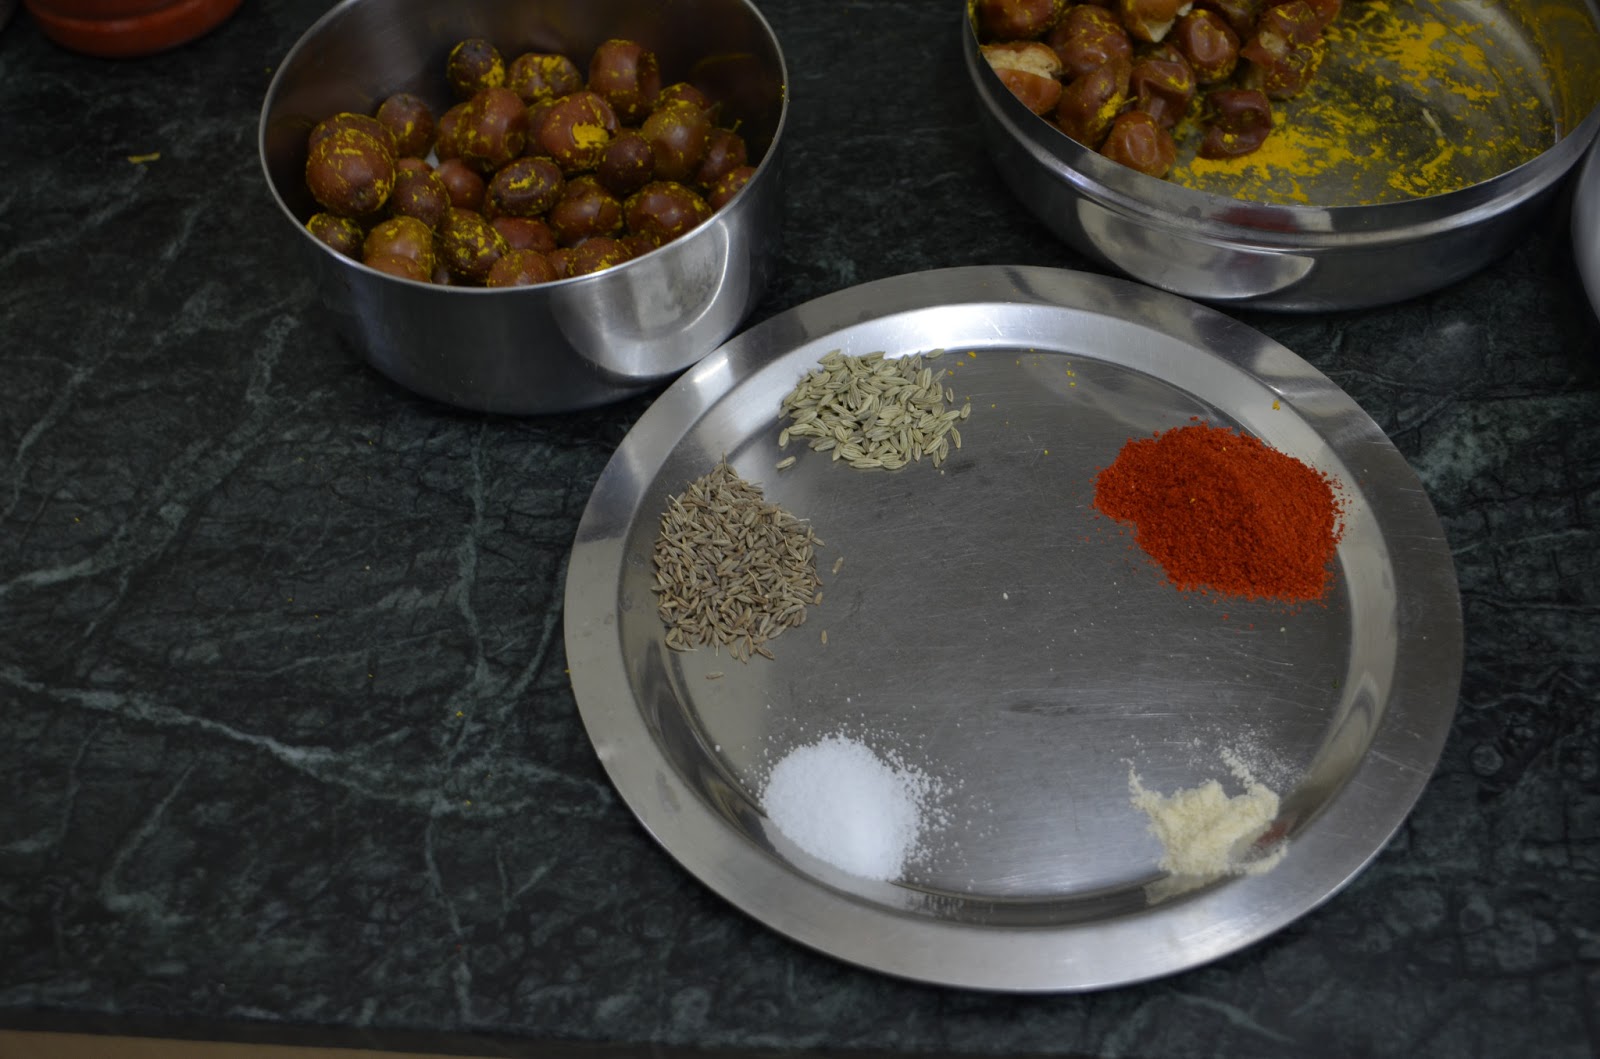
2 tsp Haldi (Turmeric powder) -
1 1/2 cups Jaggery (grated)
2 tsp Mirchi Powder (Chilli powder)
1 tsp Jeera (cumin) Powder
Salt to taste

Jaggery

For Tempering - 

1/2 tsp jeera (cumin seeds)
1/2 tsp saunf (fennel seeds)
1/4 tsp methi (fenugreek seeds)
1 pinch Hing (Asofoetida)
8 tbsp mustard oil


After drying for a day

Method
  • Wash the ber. Carefully slit each one to check for worms (some wild ones do have larvae inside).
  • Add haldi (turmeric) powder and dry in direct sunlight for a day.
  • In a kadai (wok) heat the mustard oil, add the ingredients for tempering; as they splutter add the jaggery and reduce heat and let the jaggery melt. At this point you can add 2-3 tbsp of water to help the jaggery dissolve. This will evaporate as you reduce the mixture.
  • Once the jaggery has melted, add salt, mirchi (chilli) powder and jeera (cumin) powder. Taste and adjust the seasoning as required.
  • Now add the ber and let simmer for 2-3 minutes.
  • Take off the heat and let the mixture cool. The 'kuler achar' is ready to be bottled and consumed.

The final product!!
 What is ber?
This is what the wikipedia has to say - http://en.wikipedia.org/wiki/Ziziphus_mauritiana


Sunday, March 10, 2013

Orange Date Cake

I love butter cakes, which are soft, fluffy and you cant stop at one. They are not as spongy and voluminous like some other cakes, yet make up some really delectable dishes. I guess it is the butter, which sort of calls out to you and says one more, one more.
This one is a basic butter cake, and allows for multiple variations with minor changes in procedure.

Ingredients (for Cake)
1 1/2 cups Self Raising flour (self raising flour is all purpose flour or maida with baking powder added in the ratio of 2 tsp baking powder to 1 cup of flour, sieve it together to mix both well)
125 g butter
1 tsp vanilla essence
3/4 cup castor sugar
2 eggs
1/2 cup milk
1 tbsp grated orange rind
3/4 cup finely chopped dates.

Ingredients (for icing)
 90g cream cheese
2 tsp grated orange rind
1/2 cup icing sugar (powdered sugar if you dont have icing sugar)
2 tsp orange juice

Method
Cream butter, vanilla essence, orange rind and sugar in a small bowl with an electric mixer until light and fluffy. Beat in the eggs, one at a time until combined.Stir 3/4 cups of finely chopped dates into the creamed mixture. Stir in half the sifted flour and half the milk, then stir in remaining flour and milk. 

Grease your pan (for the quantity mentioned here you will need a deep 20 cm round cake pan). Preheat your oven to 190degC / moderate / 375 deg F.

Spread the mixture into the prepared pan. Bake at 190 deg C for about 50 min. Check using toothpick technique to see if the cake is done. Once done, let it cool for 5 min before taking it out of the pan. Cool completely on a wire rack.

For the orange cream cheese frosting -
Beat the creamed cheese (when i dont have creamed cheese i use plain amul cheese spread in place of creamed cheese) until creamy. Beat in 2 tsp grated orange rind and then about half a cup of icing sugar. Add 2 tsp of orange juice (adjust quantity accordingly to make the frosting spreadable).

Spread on the cooled cake and enjoy!!!

Honey-Iced Coffee Cake

Coffee Honey Iced Cake
 This easy to do cake is a must for all coffee lovers. It is a no frills, one bowl quick mix cake. It turns out nice and soft with a beautiful flavour of Coffee. The icing is a must if you want to enjoy the flavours of the recipe, for the icing compliments the cake.

Ingredients (for Cake)
4 Tsp instant Coffee
1 Tbsp hot water
125 g butter
2 tsp vanilla essence
3/4 cup brown sugar (firmly packed) {can be replaced with regular sugar but the flavour is much better if you use brown sugar}
2 eggs
1 cup self raising flour (self raising flour is all purpose flour or maida with baking powder added in the ratio of 2 tsp baking powder to 1 cup of flour, sieve it together to mix both well)
1/4 cup custard powder
1/3 cup milk.
Remember to have all ingredients at room temperature.

Ingredients (for Honey icing)
30g butter
1 tsp instant coffee
1 tbsp hot water
1 tsp honey
1 tsp vanilla essence
1 cup icing sugar (you can also use regular sugar ground to a powder, but icing sugar gives a better texture)

Method
Dissolve coffee in hot water, combine in a large bowl with butter, vanilla essence, sugar, eggs, flour and custard powder and milk. Beat on a low speed till all ingredients are combined and then increase the speed to medium and beat for another 3-4 minutes or until the mixture is smooth and changed in colour.

I have a philips electric beater which I use for all my cakes and a microwave with a convection mode which gives excellent results for all kind of cakes and breads.

Grease your pan (for the quantity mentioned here you will need a 20 cm ring pan or round pan). Preheat your oven to 190degC / moderate / 375 deg F.

Spread the mixture into the prepared pan. Bake at 190 deg C for about 40 min. Check using toothpick technique to see if the cake is done. Once done, let it cool for 5 min before taking it out of the pan. Cool completely on a wire rack.

For the Icing - melt butter in a saucepan, remove from heat, stir in coffee (mixed with water), honey, vanilla essence and half the icing sugar. Gradually sift in the remaining icing sugar to mix to a spreadable consistency.

Spread icing and the cake is ready. Butter icing works best when slightly warm.

We garnished the cake with some roasted coffee beans on top and they provide a good crunchy coffee flavour.

Saturday, February 23, 2013

Braided Bread

Despite disagreeing on whether to make whole wheat or all purpose flour bread for most of today morning, we finally agreed to try out a recipe with all purpose flour (only). It turned out great, and the boys loved it.


Ingredients
2 teaspoons active dry yeast
1 cup lukewarm water
4 - 4 1/2 cups all-purpose flour (maida)
1/4 cup white granulated sugar (no need to powder it, regular granulated sugar will do)
2 teaspoons salt
2 large eggs
1 large egg yolk (keep the left over white for the egg wash)
1/4 cup butter / vegetable oil (we used regular salted butter)

Method

Yeast mixture after rising
 In a cup (atleast twice the size of the measuring cup) dissolve a tsp of sugar in 1 cup of luke warm water and let it rest for 10-15 min (till the yeast starts to froth and the water almost doubles). In case it doesn’t rise, then take a fresh pack of yeast and start again for your yeast is dead.


  Mix in your dry ingredients (flour, sugar and salt). Make a well in the mixture and add the eggs (and the yolk) and the butter / oil.

Mix the dry ingredients
Put in the eggs & oil in the middle
Make a well in the middle


the dough is sticky
Make the slurry
 First make a slurry in the middle with the wet ingredients and gradually mix in the flour from the sides. Use a kneader if you have one, else mix it in with a ladle. Once the whole thing becomes one sticky paste/wet dough, take it out on your working surface (which should have been nicely floured so that it doesn’t stick)
Knead it, adding a little flour if required to prevent it from sticking. (believe me, it will be very very sticky, so keep at least half a cup of flour handy). Once the dough is soft, smooth and on pushing in with your thumb, it retains the shape,  it is ready for the first rising.
 Put it in a well oiled vessel and keep covered in a warm area for 1-2 hours (until it has doubled in size)


Dough should at least double in size


Divide into 6 parts
Take out the dough, back on the well floured work surface. Divide it into 6 parts. (Dont worry if the parts are not very equal)

Now roll them into long rope like piece.

Start by using both hands in the middle
Gradually move to the sides so that the thickness remains the same

Till the dough is like a long rope
 Now, keep the ropes together, and pinch together one end.
 Then start braiding by moving the outermost rope over the next two, under the third and over the last two. Now this step is repeated over and over.
 The bread will keep tilting to the left, dont worry, your final product will be nice and straight.


 As you reach the end, pinch the last bits together. Now, using the palm press on the sides to give a rectangular shape to the bread.
Put the dough on a greased baking dish. Now, let the dough rest for another 1/2 hour to 1 hour in a warm corner.[we normally cover it up with a kitchen towel and keep it in the oven (switched off)]
After the second rising

 After the second rising, preheat your oven to 350 deg F or 180 deg C. (Normally, I preheat to 200 deg C and then lower the temp to 180 deg C for the final baking)
Now, use the left over egg white (add 1 tbsp of water) to brush the top surface of the dough generously (it gives the nice colour and sheen to the bread)
 Now, bake for 30 min at 180 deg C.
Tip - To give the feel of a bakers oven, i keep a tray below the rack, and put in a few cubes of ice every 7-8 minutes to increase the humidity inside the oven, this gives the bread a nice crust.
 Once done (you will come to know by the amazing smell of freshly baked bread in the house as well as the hollow sound when you tap the bread), open the oven door a bit and leave for 10 min.
 Then take it out and cool on a wire rack. The bread is ready to be eaten!!! enjoy

 I had some left over dough which i used to make a chicken bun (on the left) and a braided garlic bread. Both came out yummy!!

NEXT ON THE AGENDA, MAKE THIS WITH WHOLE WHEAT FLOUR!!!

Sunday, August 19, 2012

Focaccia Bread

Bread making was something we started as a necessity while in the North-East and loved it so much that we now regularly make our own bread. The smell of freshly baked bread wafting through the house is very comforting and relaxing. Focaccia bread was the first bread we had tried out. Now after a long time, had a free weekend off and we had been planning to try some new type of Focaccia topping. After effects of MasterChef was a Tomato topped one and a caramelised onion topped one. And we believe in using 'atta' in our breads as  much as possible, however, till now we have found that if we use only 'atta' then the bread tends to become heavy and dense, so we are continuously experimenting with different ratios. This bread was being made after a long time, so we decided on an equal proportion of 'atta' and 'maida'. So all you bread lovers - Enjoy

Ingredients
  • 1 1/2 cups Whole Wheat Flour (atta)
  • 1 1/2 cups All purpose Flour (maida) + lots to dust the kneading surface
  • 4 Tbsp Yeast
  • 3 Tsp Salt
  • 3 Tsp Sugar
  • 6 Tbsp Extra Virgin Olive Oil 
  • Oregano, Cummin seeds & Garlic as per your taste, these are entirely optional.

Ingredients for Topping
You can use whatever you like for the topping. The ones we used are
  • 3 Tbsp Extra Virgin Olive Oil for brushing the focaccia
  • Olives
  • Dried Tomatoes (thinly slice one large tomato, and put the slices in the oven at 160 degC for 10-15 min, and you get something like sundried tomatoes)
  • Oregano, Rosemary, Basil, Garlic
  • Cheese (here we dont get much choice of cheese, so it is mostly cheddar or mozarella or at most gouda)
  • Onions (caramelise the onions in butter and oil)
  • Mushrooms (sautéed)
The best part of this recipe is that you can top it with whatever you feel like, so feel free and experiment.

Method
  • Combine the Flours, yeast, salt and sugar. Add 6 tbsp of Olive oil and te 1 1/2 cups of warm water (Tip - add the water in stages). 
  • Mix well to produce a very sticky looking dough. 
  • Now transfer this sticky mess onto a well floured kneading surface. Knead well till you get a nice soft elasticy dough (keep adding more flour, little by little, till you get a soft springy dough)
  • Keep the dough aside (Tip - grease the container well before you put the dough in it as it tends to stick when you take it out) in a drought free place to rise (we normally pre-heat the oven to 40 deg C, put it off and keep the dough inside the oven to rise)
  • Once the dough has risen to almost twice its original size, punch it back in. Split it into 3 equal portions, shape it into whatever shape you want the bread in, we made one flatish focaccia and one regular loaf shaped one (and one portion we stored for making pizzas for the kids, YES you can make pizza bases from the same dough). Keep aside for the final rising for another 30-45 min.
  • Pre-heat the oven to 180 deg C. Place the shaped doughs on your baking surface (we use regular steel plates and it works out find, just remember to grease the plates before placing the dough on it). Make small indentations on the top surface of the dough, brush liberally with olive oil and add your toppings.
  • Bake for 30 min at 180 deg C. You will see the bread rise (it is like magic) and somewhere close to 20 min into baking an amazing aroma of freshly baked bread will start mesmerising you. This is the best indication that your bread is baking well. After 30 min, leave the bread in the hot oven for another 10-15 min, then take it out and keep to cool on a wire rack (we use the wire rack of the oven itself) for another 15 min. Viola, your bread is ready.
I dont think we need to give any tips on how to eat the bread. You can eat it with anything, and just as it is as well. Add some butter or some extra virgin olive oil and eat it - it tastes amazing, especially when the bread is nice and warm.
Cheers