Friday, May 14, 2021

Kheema paav

It's Eid and a triple weekend, with a lockdown in force. So how do we party?

We decide to make Kheema paav. Now, we don't claim either recipe, both are from the internet, with minor tweaks.
The ladi pav is Sumod Tom's recipe, we've always found his recipes make for great bakes. The mutton kheema recipe is by Sanjyot Keer, another pro. So here goes-

Ladi Pav

Ingredients
All purpose flour / maida : 2 cups
Whole wheat flour / atta : 2 cups
Luke warm water : 160 ml
Egg : 1 (optional)
Milk : 160 ml (add half a lemon and keep for 15 min)
Sugar : 2 tbsp
Instant /active dry Yeast : 2 1/2 tsp
Salt : 1 3/4 tsp
Butter : 4 tbsp
Milk powder : 1/3 cup

Method
Add the dry ingredients in a bowl/परात (maida, atta, salt, sugar, yeast and milk powder) and mix them well. 
Note- If you are unsure of your yeast then add a tbsp of sugar (from the 2 tbsp called for in the recipe) to the luke warm water and add the yeast and set aside to rise. Once the yeast is activated add it to the dry ingredients along with the rest of the liquids.
Add all the liquids (except the butter) to the dry ingredients. You will get a very wet dough. At this time we used a scraper and a ladle to manage the wet and sticky dough. Add the butter a tbsp at a time. 
Once it starts coming off the sides, transfer to a lightly floured work table/area. Knead gently (stretch and pull). You may add a little flour taking care not to add too much. The dough will gradually get firm and elastic. 
As Sumod says, don't add too much of flour and don't knead too hard.
Once the dough is firm place it in a greased bowl. Grease the dough as well. Cover and keep in a warm  draught free place for around 45 min or till it doubles in size.
Once double, take out on the work table and gently deflate the dough, portion into equal sized balls without any seams. If there's a seam it should be placed down with the smooth side facing up. We were able to make 21 balls and placed them in two trays.

Grease your baking tray and place the balls with a little place between the balls. (Not too far apart and neither too close- you need to give the balls space to rise but not too much else it will not get the height. 
Cover with a dry towel and set aside for the second rising. The balls will again double in size and sort of stick to each other. 
Preheat the oven to 200 deg C.
Once preheated, gently brush the dough with cream/milk/egg wash. We did a milk and cream brush.
Bake at 200 deg C for 15 min. Then cover with aluminium foil (only if the top is golden brown, so that it doesn't get burnt) and bake for another 10-15 min (depending on how many you are baking, if the entire dough is in, you'll need 15, else 10 min should do). So the total baking time is 25-30 min.
Once done, take out, brush some butter on top for a nice gloss (optional) and cool for 2-3 min and then take out the pav onto a rack to cool. (This prevents the steam from making it soggy on the sides)
Original recipe here 

Kheema

Our recipe will be put here soon. For the moment putting the link to the inspiration...
Sanjyot Keer, thanks, it turned out amazing.


Kheema cooking

Saturday, April 24, 2021

Milk bread loaf

Ingredients:

3 and 1/4 cups all purpose flour
1 and 3/4 cups milk [warm]
2 tsps instant dry yeast
2 tsps suger
1 tsp salt
2 tbsps butter [softened]
1 tsp sesame/ nigella seeds


method;

1. Preparing the dough:
  • Sift the flour and salt together in a large bowl.
  • Mix the sugar and yeast in 1 cup of warm milk. Set aside for a few minutes  for the yeast to get activated.
  • Add the activated yeast to the sifted flour and start bringing the dough together.
  • Add the remaining milk and mix in. you now have a sticky, messy dough. [This is  how it is supposed to be].
  • Start kneading the dough and continue until it becomes less sticky [ this will take about 5-6 minutes]. One or two tablespoons of flour can be added if the dough is too sticky.
  • Add the softened butter and continue to knead for another 5 minutes. Your dough will now be smooth, elastic and non-sticky.
2.  First proofing

  • Roll the dough into a tight ball and tuck in the edges to get a smooth round top. The top and the bowl can be brushed with a little oil.
  • Cover the bowl with a damp cloth and set aside for an hour or until the dough doubles in size.
3. Second proofing

  • Shape your dough into a tight cylindrical log and tuck in the edges before placing in a loaf pan lined with parchment. The top of the dough must be a smooth as possible. 
  • Place the tucked side down. I have used a 8 inch wide and 3.5 inch deep loaf pan for this recipe. Cover it with a damp cloth and leave it for an hour.
Baking:
  • Pre heat the oven to 200 Degrees C for 10 minutes.
  • Once the dough is ready, brush the top with milk and sprinkle the nigella seeds and the sesame seeds.
  • Bake in the preheated oven for 10-12 minutes at 200 degrees C and then reduce the temperature to 180 degrees C. Continue to bake for another 30-35 minutes. If the top starts browning too soon, you may cover it with aluminium foil after 20 minutes of baking. Once nicely browned and baked for 35-40 minutes your bread should be ready. Tap the top and sides of the loaf. If it sounds 'hollow' , your bread is done.
  • Remove from the baking pan and allow to cool completely on a wire rack before slicing.

Tips:
  • Oven temperature and time may vary. Keep an eye on your bread after 20-25 minutes of baking.
  • The bread dough should be loose, soft and non- sticky . Please add the required amount of liquid even if it seems like a messy affair to begin with. We do not want a firm dough. You may add a little extra flour while kneading if you find it very sticky.

Quick whole wheat bread

Another experiment at bread making, and another perfectly baked bread. This one is a quick 2 hour bread. However, the process is hastened by the use of a food processor to knead. I guess without the food processor, you can add another 10-12 minutes and some exercise in the kneading process. 

Ingredients

2 Cups Whole wheat flour (atta)
1/2 + 1/4  Cup bread flour (maida)
2 Tbsp Sugar
1 tsp Salt
2 tsp Yeast (I used instant, but I guess you can use Active dried as well)
1 Egg
2 Tbsp Olive oil
2 tsp Sesame seeds
1 tsp chilli flakes
2 tsp Flax seeds
2 tsp Italian seasoning
The last four ingredients are optional. 

Method

Combine all the dry ingredients (except 1/4 Cup maida).  Put it into the food processor. Add the warm water, egg and olive oil and knead at medium speed till it forms nice soft dough. Add the leftover 1/4 Cup maida. increase speed to high for a minute.
Take out the the dough and knead a bit with your hands, turning and folding the dough. Once the dough has some spring in it, proof it for around half an hour by covering it with a kitchen towel. Unlike most dough the cue of doubling does not apply here, the dough does rise a bit though. Now take it out and flatten it out on the work surface, then roll it up to the shape of a loaf. Seal the ends. 
Grease a bread tin (4x8 in). Put in the dough with the sealed side at the bottom of the pan. Proof it again in a draught free place for another 25-30 min. Here you can use the cue of the bread rising about 1/2 - 1 inch above the bread tin.
Pre-heat your oven to 375°F / 195°C. 
Then bake the bread for 15 min at 195°C. By now the top is fairly browned. Now cover the top with aluminium foil and bake for another 15 minutes at 195°C.
Take out, let cool for 10-15 min and then slice it.
Enjoy with butter or in a sandwich.

Masala bun (keema filing)

\

Another lockdown weekend, nothing much to do. There was some chicken mince so we decided to make stuffed buns. While searching the net for a good recipe, mits came across this fancy looking bun; turned out nice too.

You can substitute the mince with any number of things - potato, paneeer etc. The filling should be dry.
Recipe courtesy @Trickeys kitchen
 So here goes
This makes 10-12 buns

Ingredients-
For buns:
Flour (maida) - 550g
Oil - 90 ml
Yeast - 1 tbsp
Salt - 1 tsp
Milk - 300 ml (lukewarm)
Sugar - 25 g or 2 tbsp
Egg - 1 medium sized (plus about a tbsp for egg wash, this is optional)

For mince filling:
Chicken/lamb mince - 500 g
Onion - 1 medium chopped
Garlic - 1 tbsp (chopped)
Ginger - 1 tbsp (chopped)
Green chillies - 2 (chopped), may add more or less depending on how spicy you want it to be
Coriander chopped - as per taste
Spices (to taste) - 
dhaniya (coriander) powder - 2 tsp
Jeera (cumin) powder - 1 tsp
Pepper powder - 1/2 tsp
Haldi (Turmeric) powder - 1/4 tsp
Chilly powder - 1 tsp
Chaat masala - 1 tsp
Garam masala - 1/2 tsp
Salt - to taste

Preparation
 
Keema Filling
Put some oil in a pan, after it heats up, add onion, green chillies, garlic, ginger in that order.
Saute.
Add the mince and saute. Add salt. Let the water evaporat and the mince cook.
Add all the dry spices. Add fresh coriander. 
Once cooked, let it cool.

Bun dough
Mix all the dry ingredients. Add the wet ingredients. It's a sludgy dough initially. Knead for about 8-10 min. The dough starts firming up and has a nice bouncy feel to it.
Cover and set aside in a draught free place for the dough to rise.
Once it's more than double (approx 45 min), take it out on your work area and deflate it. Divide into 10-12 equal portions.
Now stretch and fold each ball a few times and then roll into a ball and rest for another 45 min.
 
 Stuffed Bun
 
Now drizzle some flour on the work table and roll out each ball of dough to a 2-3 mm thick circle (a little thicker than the roti).
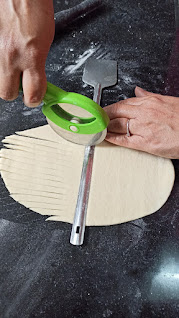
Now on one half of the circle make long cuts using a knife or a piazza cutter.
0.

Now fold the other half over the half with striation to form a semi circle. With your fingers press the edges so that they stick.
Take 2-3 spoonfuls of the mince filling and put it in the middle. Then fold over one-third of it over the stuffing. Then fold the other third over. Gently seal the edges with your fingers.
Grease your baking tray and place these stuffed triangles with the folded top side down.
Rest for another 45 min.
Once the dough has rested, pre heat the oven to 180 deg C. 
Take a mix of egg and milk and brush the top of the buns. Sprinkle some sesame seeds and or Nigella seeds.
Bake for 25 min at 180 deg C.
Once done, take out and brush with some butter for a glossy finish and cool on a wire rack for 10 min.
The buns are now ready to be devoured.

Sunday, March 14, 2021

Garlic focaccia almost no knead bread

This one is another internet modified recipe. Our penchant for garlic bread continues, much to Papa's chagrin...'oh why another tempting bread with the strong pungent flavour of garlic!!' he is likely to wonder; but being the quintessential father of the bride, is much too decent to say so...and will make a polite 'no thanks, i will pass'.
This recipe is a simple one and the product is a super soft flavourful bread with an amazing spring to it. Enjoy

Ingredients
Luke warm water- 200ml
Sugar - 1 1/2 tbsp
Salt - 1 tsp + a sprinkling of Himalayan pink salt or rock salt (to be sprinkled just before baking)
Yeast - 3/4 tsp
Olive oil (or any veg oil) - 1 1/2 tbsp (to start with, thereafter a little every time you fold after a proofing and about a tbsp of preferably olive oil to drizzle over before baking)
Maida or bread flour - 250 gm
Garlic- 3-4 bulbs sliced thinly.
Oregano seasoning & chilli flakes to taste
Basil leaves fresh toppings of your choice - optional

Method
Add the sugar, 1 tsp salt and yeast to the water and stir to mix in a पतीला or a big bowl. Add the olive oil and then the maida or flour (we are yet to try a mix of atta and maida / whole wheat and all purpose, so will update when we do).
Mix in with a ladle or spoon till you get a sticky dough. Now cover and set aside for half an hour in a draught free corner.
After the first proof, using either your hands or a ladle and a little oil fold the dough for about 2-3 min. Set aside for second proofing for another half hour.  
Repeat this process for about 4 times. The gluten starts working and you will be able to stretch the dough as you fold it.
After four such proofing, grease a 7x3 inch round tin. 
Pour your dough into the tin. Drizzle about half a tsp of olive oil over the dough and poke with your fingers to make indentations. Place the garlic slices in these indentations along with choice of whatever toppings you feel like. Mine had freshly picked basil leaves from the garden and some oregano. Sprinkle some Himalayan pink salt or rock salt and another light drizzle of olive oil. Set aside for another half hour.
Preheat the oven to 230degC.
Then bake for 15-18 min at 230degC.
Once done, take out and keep for 10 min and then take out from the tin and keep on a rack for another 5 min to cool.
Enjoy with pasta, soup or just like that with a dollop of butter. 

Sunday, March 7, 2021

Cranberry wool bread

Wool breads are apparently a rage. We have always loved a pull apart bread and this seemed just another variant. We were also tired of whole wheat breads... Just wanted a regular maida (all purpose flour) bread. 
This one is very pleasing to look at and like all the other breads here, delicious.

Ingredients
  • Milk - 80 ml
  • Bread flour / maida - 325 g or 2 1/4 cup
  • Yeast - 3g or 1 1/2 tsp
  • Sugar - 30g or 2 tbsp
  • Salt - 1 tsp
  • Egg - 1 and some egg white for egg wash (you can replace egg wash with milk wash as well)
  • Whipping cream - 100 ml
  • Cranberry -  60 g
  • Brown sugar (optional) - 6 tsp

Method
Proof the yeast in 80 ml of warm milk with a tbsp of sugar.
While the yeast is proofing, mix the dry ingredients (flour, salt, remaining sugar). Add the milk/yeast mixture (when you see bubbles forming in the milk, indicating that the yeast  is activated).
Add the egg and whipping cream. (Since this is the only fat/shortening I used full cream).
Knead till you get an elastic dough.
Let rise for an hour or till double at a draught free place (I keep it in a covered bowl in the oven itself)
Once double in size, take out on a platform, de-gas by gently flattening to about two inch thickness and then cut it into six portions. Now tuck in the sides around 6-8 times and make a ball. Cover with a warm damp cloth and rest for 15 minutes.
After having rested the ball of dough for 15 minutes, take out one ball at a time and roll them out into an oval shape.

Now on one half of the dough make cuts along the long side 
Make six portions of the cranberries.
Put one portion of the cranberries on the rolled out dough. You can add 1 tsp of brown sugar if you want. 
Now fold the sides inwards and then the bottom. 
Now roll the dough into a cylinder/Swiss roll.

Grease a 20x6 cm round till. Put butter paper on the bottom. And place the cylinder in the tin.
Tip- keep the wool fold side towards the wall so that when the dough rises, it doesn't unfurl itself.

Cover with a warm damp cloth and keep in a drought free place for another hour.

Pre-heat the oven to 170deg C.

Once the dough has risen again, gently (so that you don't deflate the risen dough) do an egg wash / milk wash over the risen dough.
Place the tin in the oven and bake at 170 deg C for 20 min.

Once done, the crust will have a nice golden brown look, it will be firm and the bread will sound hollow. Take out from the oven, and let cool for 10 min. Then take out from the tin and further cool.
The bread is now ready to enjoy with a generous dollop of butter / jam.


Tuesday, January 26, 2021

Garlic pull-apart bread #2

We love pull apart breads, they have a sort of magic about them, a loaf of bread which doesn't need to be sliced. And warm garlic bread is an ultimate mood enhancer.
So we (led and directed by Himanshu) planned a picnic... After a lot of debate discussion and research (addition of Peanut has changed the rules of engagement) it was decided that the picnic spot would be Sundar Nursery. Mits has been planning to go there for more than a year and I am sure she had a big role in the decision (post the extended debate discussion and research). The weather was perfect, bright & sunny and after a great republic day parade and flypast nothing better to celebrate the republic than a picnic- the first outing post Covid.
Must have been brainfreeze, I volunteered ( forgot the old academy saying "never volunteer) to make garlic bread. This is not my original, my able (forced into the job) photographer missed out the middle, but the end result was fabulous. It's a quick recipe and pretty simple.
So here's the recipe...

Ingredients (for bread)
Maida (all purpose flour) : 2 1/2 cups
Sugar : 3 tablespoons (tbsp)
Salt: 1/2 teaspoon (tsp)
Active dried yeast.: 1 tbsp
Garlic powder: 1 tbsp
Milk (warm) : 1 cup
Egg: 1 (and some2 tbsp for the egg wash)
Butter/olive oil: 3 tbsp (this recipe calls for a lot of butter, so here you have a choice to make it rich or use olive oil, the resultant product is almost the same)
 
For the filling
Butter (softened) : 1 cup
Salt: 1 tsp
Green onion: 1/2 cup chopped
Garlic ( chopped fine): 1 tbsp 
Garlic powder : 1 tsp (optional)
Note: no rules for the filling, amount of garlic is optional, I also add oregano or mixed herbs depending on what's available at home)

Method
Mix in the dry ingredients. Proof the yeast (If you doubt if it's still active, if not you can directly add it all in the flour). Add the milk along with the yeast. Mix it with a wooden spoon, add the egg and the oil/butter. The resulting dough is a shaggy one.
Note: for some reason, the dough this time was pretty dry so I ended up adding another half cup of water.  So go by your feel. A little bit of extra water/milk is okay I feel, as the Indian flours tend to soak up a little extra.
Knead till the dough is soft and elastic.
Keep aside for proofing (in an greased container) for an hour or till it doubles in size. I used a trick today to hasten the process- put it in the oven on preheat for 100°C (5min).
While the dough is proofing, make the garlic butter mixture. Mix in all the ingredients and set aside. 
Once the dough doubles, take out the dough, punch our the air and fold it (not knead) for about 5 min. Then roll it out to about 5mm thickness (doesn't really matter to be precise here). Get the garlic butter mixture, it should be soft enough to spread but not too liquidy. Spread out the garlic butter on the rolled out dough.
Out the oven to preheat at 200°C.
Now roll the dough like a swiss roll. Cut even sized portions. And place the slices (of the Swiss roll) into a greased bread tin. Remember that the dough will rise again to almost double, so don't stuff it in the tin excessively.
Once the second rising has taken place, brush a mixture of egg whites and milk over the bread (this is only to give the lovely brown glossy colour to your bread)
Bake for 30 min at 180°C
Check at around 15 min, in case the bread is browning excessively, cover the bread with aluminium foil and continue baking.
Once done the bread has a hollow sound to it when tapped.
Take out from the oven and keep to cool in the tin for about 15 min and then take out and cool on the rack for another 15 min.